Ducati 049 Build – Part 7: Tyres, Tantrums and Wheel Nut Wizardry
Tyre Time for the 049
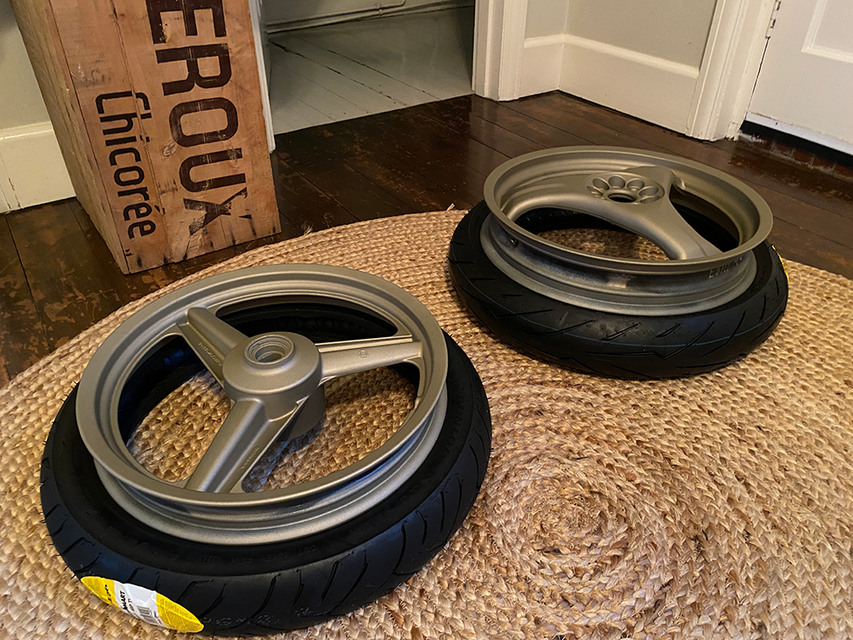
With the wheels for the Ducati 049 finally looking the part, it was time to get some boots on them. Fresh rubber day is always a good day – that “new tyre” smell, the promise of future lean angles, and the quiet hope that you won’t immediately square them off.
The plan was simple: pick suitable tyres to match the 049’s intent (50cc road fun), get them mounted, and roll smugly back into the garage for the next stage of the build. In classic Lid Life fashion… it didn’t quite go like that.
DIY Tyre Fitting: The Front vs The Rear
Step one: home tyre fitting. Because we’re bikers, and obviously, we can do everything with a couple of tyre irons, some lube and a stubborn streak a mile wide.
The front tyre was an absolute dream. Bit of prep, some careful persuasion with the irons, and it popped on with a satisfying final push. Bead seated, no dramas. We even had that dangerous confidence boost: “This isn’t so bad…”
Then came the rear.
The rear tyre took one look at our tyre levers, folded its metaphorical arms, and said, “Nope.”
We tried.
- More lube
- More leverage
- More creative language
After a lot of effort, sweaty brows, and that sinking feeling where you start imagining bent rims and torn beads, we did the sensible thing: called it.
Sometimes the bravest thing you can do in the garage is admit defeat before you break something expensive.
Calling in the Pros: Local Garage to the Rescue
 With the rear wheel and tyre chucked in the back of the car, we headed to a local motorcycle garage – the sort of place that always has a few interesting bikes outside and a faint smell of chain lube in the air.
The lads there were immediately interested in the 049 build. As soon as they clocked the wheel and we explained what we were putting together, the questions started: “What engine’s going in it?” “What are you doing about the electronics?” Exactly the kind of chat that reminds you why a good local bike shop is worth its weight in gold.
Then they stuck the rear tyre on the machine… and even that didn’t go on easily.
With the proper kit, a bead breaker, and a tyre machine doing the heavy lifting, it still put up a fight. The fitter just looked over and said something along the lines of:
“Yeah, that’s a seriously tight tyre. You’d never have got that on with hand levers.”
That’s both reassuring and slightly humbling. Reassuring, because we hadn’t just forgotten how tyres work. Humbling, because sometimes the right answer really is: let the professionals do their thing.
A few minutes later – with no damaged beads, no bent rims, and no swearing surcharge added to the bill – the rear was finally on. Front and rear tyres: fitted, seated, and ready for action.
Lesson learned? There’s no shame in outsourcing the stubborn jobs, especially when it comes to critical bits like tyres. If it feels like you’re forcing it, walk away, grab a brew, and consider letting someone with a machine and a few thousand tyres’ worth of experience handle it.
Wheel Nut Drama: Discontinued and Eye-Watering Prices
With the tyres sorted, attention turned to the wheel nuts. This is the part of a build where you think, “How hard can it be? They’re just nuts.”
Famous last words.
The original Aprilia RS50 wheel nuts for this setup are now discontinued. That’s already a bit annoying. But then you look on eBay and see used originals at around £35 a pop. And we don’t need one. We need three.
So that’s over a hundred quid for three small chunks of metal. Lovely.
Now, we all love genuine parts where it matters, but there’s a line between “OEM quality” and “I’m not paying that for a nut that’s older than some of the apprentices in the workshop.”
Finding an Alternative: Shorten, Fit, Perfect
Time for a bit of Lid Life-style problem solving: not a bodge, but a smarter alternative.
After some digging around, we found an alternative set of nuts that matched what we needed:
- Correct thread
- Suitable material
- Decent quality
- And crucially – not £35 each
They were slightly too long for the setup, but that’s easy enough to sort. A careful trim and clean up later, and they were ready to test fit.
Slipped them on, nipped everything up, and they sat perfectly. No fouling, no weird angles, no “that’ll do” vibes. Just a proper clean fit, exactly how you want it on a build like this.
Of course, everything was torqued up correctly – because while we’re happy to joke about biscuits and bodges, we don’t mess about when it comes to safety-critical bits like wheels and fasteners.
Takeaways from Part 7
This stage of the Ducati 049 build was a great reminder of how projects like this really go: a mix of satisfying wins, stubborn parts, and a bit of detective work to dodge silly prices.
- Tyres: Pick something suitable for how you’ll actually ride the bike, not just what looks good in photos.
- DIY limits: Fitting tyres at home is doable… until it isn’t. If it feels sketchy, get a pro involved.
- Discontinued parts: Don’t be afraid to hunt for quality alternatives. Just always match specs and stay on the safe side.
- Cost vs sense: Three nuts should not cost more than your weekly food shop.
The 049 now has proper rubber, properly fitted, and wheel nuts that do the job without emptying the wallet. One step closer to that first proper ride where all the garage hours suddenly feel worth it.
Stick around for the next part of the build – we’ll keep talking bikes, bodges, and biscuits as the Ducati 049 edges closer to firing up and hitting the road.