Restoring a Bike with Rattle Cans – A Proper Spray Job
There’s something special about bringing an old bike back to life. Whether it’s a barn find, a forgotten project, or just your trusty old ride that’s seen better days – giving it a fresh coat of paint is one of the most satisfying parts of any restoration. And yes, you can do it with rattle cans – with the right prep, patience, and a bit of garage time.
Step 1: Strip It Down Properly
Restoration’s not about cutting corners – so don’t just tape off the tank and hope for the best. Strip the panels, the tank, the mudguards – everything that’s getting painted needs to come off. Not only does this give you cleaner lines, but it also avoids that tell-tale overspray on your engine cases or frame rails.
Step 2: Degrease, Clean, and Sand
Restored bikes look clean because they are clean. Start with a proper degreaser – something that can cut through years of built-up muck, oil mist, and garage grime. Spray it on, let it sit for a minute or two, and then wipe down with a clean rag. Pay special attention to the underside of tanks, the corners of fairings, and anywhere oily hands might have left their mark.
Once you’ve got the surface degreased, it’s time to wash everything down with warm soapy water. Rinse thoroughly and let it dry completely. Water trapped in crevices can play havoc later when you’re laying down primer.
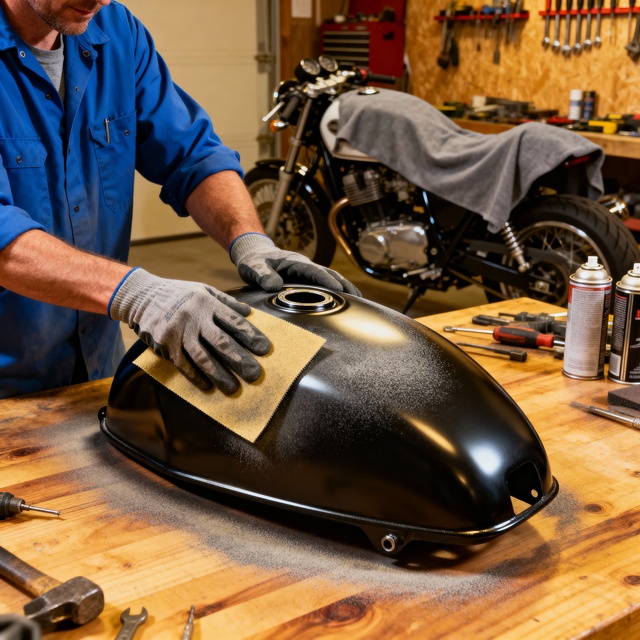
Now, grab your wet and dry sandpaper. Start with 400 grit to scuff up the original paint – you’re not trying to strip to bare metal or plastic, just roughen the surface enough for the new paint to grip. Focus on achieving a smooth, even, matte finish with no shiny patches left behind. Use a sanding block where you can, and your fingers for the fiddly bits. Follow up with 800 grit to smooth it all out before priming. Wipe everything down again with a tack cloth or lint-free rag to remove sanding dust.
If there are any deep scratches, gouges, or dings, now’s the time to fill them with plastic filler or metal putty (depending on the panel material). Let it cure fully, then sand smooth before moving on.
Step 3: Prime Like a Pro
Primer isn’t just for looks – it helps the colour coat stick and evens out small imperfections. Choose a primer suited to the material you’re painting – plastic primer for fairings and panels, and etch primer for bare metal parts. Give the can a good shake (at least two minutes) before spraying, and keep shaking regularly while you work.
Spray in light, sweeping passes, holding the can about 15-20cm from the surface. Always keep the can moving – aim for multiple thin coats rather than trying to cover in one go. Let each coat dry thoroughly (check the can for recoat times – usually around 10-20 minutes) before adding the next.
After 2-3 coats, inspect the surface. If it feels slightly rough, lightly sand it with 1000 grit paper to smooth it out before applying your colour coat. This step is key to getting that professional-looking finish. Wipe clean with a tack cloth before moving on.
Step 4: Time for Colour
This is the fun bit – where your vision starts to come together. But patience still matters. Shake your colour can thoroughly for at least two minutes. Test it on a bit of cardboard first to make sure the nozzle sprays cleanly and evenly.
Apply your colour in the same way as the primer – light, even strokes, overlapping each pass slightly. Never try to get full coverage in the first couple of coats – rushing this step is how you get drips, sags, and that dreaded orange peel texture. Start with a mist coat, then build up with 3-5 full coats depending on the colour. Metallics and lighter shades usually need more coats for even coverage.
Let each coat dry to the touch before applying the next, usually 10-30 minutes depending on humidity and temperature. Don’t be tempted to touch or fiddle with the finish too soon – a single fingerprint can mean a full respray.
Once you’ve laid down your final colour coat, give it a bit longer to set – at least an hour – before moving on to clear coat. If you’re using decals or graphics, apply them after the colour but before the clear coat goes on, so they’re sealed in and protected.
Step 5: Clear Coat to Finish
Clear coat adds gloss and protection – or a matte finish if that’s your vibe. Same rules apply: light coats, no rushing, and proper drying time between layers. At least 2–3 coats will do it, more if you’re after that deep-gloss look. Don’t be tempted to go thick – slow and steady wins the finish.
Step 6: Let It Cure – Properly
This is where most rush the job. Yes, it might be dry to the touch in a few hours – but it won’t be fully cured for a few days. Give it time before bolting it all back together. Stick it in a warm, dry spot and leave it alone. Trust us, it’s worth the wait.
Step 7: Final Polish
Once cured, a light polish with a rubbing compound will smooth out any orange peel and bring out the shine. Take your time, use soft cloths, and admire the transformation. From flaky old paint to fresh new finish – you did that.
Extra Tips from the Garage Floor
- Don’t spray in the wind. Seriously. You’ll paint the dog, the bins, and half the driveway.
- Wear gloves and a mask. Not because it looks cool – because paint fumes are no joke.
- Test spray on a bit of cardboard first – it’ll show you if the nozzle’s dodgy.
- Label your parts – putting a restored bike back together should be fun, not a jigsaw puzzle.
Restoring a bike is a labour of love, and rattle can spraying is one of those garage skills that gets better every time you try it. So if you’re mid-project and wondering whether to DIY the paint – go for it. It’s budget-friendly, hands-on, and if it all goes wrong… well, that’s what sandpaper’s for.
Got a resto project on the go? Share it on the forums or stick it on Lid Life when it’s done – free listings, plenty of banter, and a proper home for bikers who get stuck in.
Ride safe – and spray straight.